

URPの色収差を拡張する【Advent Calendar 12/21】

はじめに
この記事は Colorful Palette アドベントカレンダー 12/21の記事です。
株式会社 Colorful Palette に 12月1日付で入社しました、クライアントエンジニアの とめさん と申します。
現在はグラフィックスまわりの業務をメインに行っています。
今回は、URPの色収差のカスタマイズについて書きたいと思います。
環境
Unity 2021.3.15f1
Universal RP 12.1.8
Windows 11
色収差エフェクト (Chromatic Aberration)
URP Post Processing にある、Chromatic Aberration を利用することで、
色収差の画面効果を適用できます。


画面の周辺に注目すると、色がずれていることが分かります。
画面中央付近は、色がずれていません。

色収差とは何か
UnityのChromatic Aberrationエフェクトは、現実世界のレンズの色収差という物理現象を再現したものになります。
光がレンズを通過するとき、光が屈折します。
レンズを通過するときの光の曲がり方(屈折率)は、光の色によって異なります。
青い光は大きく曲がり、赤い光は小さく曲がります。
この屈折率の違いにより、色のズレが起きます。
このズレのことを色収差と呼びます。分光とも呼ばれる現象になります。

レンズの中央を通った光は、ほとんど屈折しないため、色のズレは小さくなります。
レンズのふちを通過した光は、大きく屈折するため、色のズレも大きくなります。
Unity標準の色収差の特徴
Unityの URP Post Processingは以下のような特徴を持ちます。
画面の周辺ほど、色が大きくずれる
画面中央付近は色のズレが小さい
シェーダーコード
色収差エフェクトは、URPパッケージのUberPost.shader にて実装されています。
https://github.com/Unity-Technologies/Graphics/blob/master/Packages/com.unity.render-pipelines.universal/Shaders/PostProcessing/UberPost.shader#L149-L162
#if _CHROMATIC_ABERRATION
{
    // Very fast version of chromatic aberration from HDRP using 3 samples and hardcoded
    // spectral lut. Performs significantly better on lower end GPUs.
    float2 coords = 2.0 * uv - 1.0;
    float2 end = uv - coords * dot(coords, coords) * ChromaAmount;
    float2 delta = (end - uv) / 3.0;

    half r = SAMPLE_TEXTURE2D_X(_SourceTex, sampler_LinearClamp, uvDistorted                ).x;
    half g = SAMPLE_TEXTURE2D_X(_SourceTex, sampler_LinearClamp, DistortUV(delta + uv)      ).y;
    half b = SAMPLE_TEXTURE2D_X(_SourceTex, sampler_LinearClamp, DistortUV(delta * 2.0 + uv)).z;

    color = half3(r, g, b);
}
テクスチャを3点でサンプリングし、それぞれをR, G, B, チャンネルに格納しています。
half r = SAMPLE_TEXTURE2D_X(_SourceTex, sampler_LinearClamp, uvDistorted                ).x;
half g = SAMPLE_TEXTURE2D_X(_SourceTex, sampler_LinearClamp, DistortUV(delta + uv)      ).y;
half b = SAMPLE_TEXTURE2D_X(_SourceTex, sampler_LinearClamp, DistortUV(delta * 2.0 + uv)).z;

color = half3(r, g, b);
画面中央から離れるほど、サンプリング間隔 deltaが大きくなります。
float2 coords = 2.0 * uv - 1.0;
float2 end = uv - coords * dot(coords, coords) * ChromaAmount;
float2 delta = (end - uv) / 3.0;
イラスト表現における色収差
イラスト表現において、空気感を出すために色収差が使われることがあります。
イラストのRGBを横や縦にずらす
イラストのRGBを拡大・縮小する
視線を誘導したい部分には色収差をかけず、周辺には色収差をかける
例えば、キャラクターの顔には色ずれをかけず、その周辺に色ずれをかける
現実の色収差は、画面の中心で色ずれが発生しませんが、イラストの世界では画面中央の色をズラすといったことを行います。
Unity標準の色収差では、イラストのような色ずれを表現できません。
今回は、イラストの世界で使われる色収差を再現することに挑戦してみたいと思います。
色収差を拡張する
以下をコントロールできるような色収差エフェクトを実装してみます。
画面中央の色ズレの強度
画面周辺の色ズレの強度
歪みの中心軸をコントロール
色収差の実装アプローチ
独自のポストプロセスを実装する場合、以下の2つのアプローチが考えられます
手法1 : 独自のScriptableRendererFeatureやシェーダーを自作する方法
手法2 : URPを改造する方法
手法1 は実装の難易度が高いです。
URP12のURP PostProcessingは、内部的に「_CameraColorAttachmentA」や 「_CameraColorAttachmentB」 といったRenderTexture を確保し、ポストプロセスの途中経過はこれらのRenderTextureに対して読み書きを行います。
独自のポストプロセスをURP PostProcessingと併用させたい場合、自作のRenderPassからうまいこと 「_CameraColorAttachmentA」や「_CameraColorAttachmentB」といったテクスチャを読み書きさせる必要があります。
そのためには、URPのレンダーパイプラインの挙動を理解する必要があり、難易度が高いです。
また、自作したポストエフェクトを制御するために、独自のVolumeComponentを作る必要もあるため、実装のコストも高いです。
手法2を採用する場合、コードの一部分を書き換えるだけで済むため、比較的容易に実装すること可能です。
今回は、手法2 URPパッケージを改造することで、独自の色収差を実装したいと思います。
URPパッケージをカスタマイズする準備
プロジェクトルート/Library/PackageCacheに、URPパッケージがあります。

URPパッケージをコピーし、Packagesフォルダの中に配置します。

これにより、URPパッケージをカスタマイズできるようになります。

色収差パラメータの追加
今回の色収差において、パラメータが3つ必要になります。


UberPost.shader にパラメータを追加します。
https://github.com/Unity-Technologies/Graphics/blob/master/Packages/com.unity.render-pipelines.universal/Shaders/PostProcessing/UberPost.shader#L57-L76
コメントアウトしている行は、修正前のコードになります。
float4 _Distortion_Params1;
float4 _Distortion_Params2;
// float _Chroma_Params;
float4 _Chroma_Params;
half4 _Vignette_Params1;
float4 _Vignette_Params2;
float2 _Grain_Params;
float4 _Grain_TilingParams;
float4 _Bloom_Texture_TexelSize;
float4 _Dithering_Params;

#define DistCenter              _Distortion_Params1.xy
#define DistAxis                _Distortion_Params1.zw
#define DistTheta               _Distortion_Params2.x
#define DistSigma               _Distortion_Params2.y
#define DistScale               _Distortion_Params2.z
#define DistIntensity           _Distortion_Params2.w

// #define ChromaAmount            _Chroma_Params.x
#define ChromaAmountCenter      _Chroma_Params.x
#define ChromaAmountAround      _Chroma_Params.y
#define ChromaPosition          _Chroma_Params.zw

#define BloomIntensity          _Bloom_Params.x
#define BloomTint               _Bloom_Params.yzw
#define BloomRGBM               _Bloom_RGBM.x
#define LensDirtScale           _LensDirt_Params.xy
#define LensDirtOffset          _LensDirt_Params.zw
#define LensDirtIntensity       _LensDirt_Intensity.x
色収差の処理を修正
色収差の処理を書き換えます。
https://github.com/Unity-Technologies/Graphics/blob/master/Packages/com.unity.render-pipelines.universal/Shaders/PostProcessing/UberPost.shader#L153-L155
■ 修正前
float2 coords = 2.0 * uv - 1.0;
float2 end = uv - coords * dot(coords, coords) * ChromaAmount;
float2 delta = (end - uv) / 3.0;
■ 修正後
色収差の位置ChromaPositionからの距離dist を利用して、RGBズレChromaAmountCenterとChromaAmountAroundの線形補間を計算しています。
float2 coords = 2.0 * uv - 1.0;
float dist = (length(coords - ChromaPosition));
float2 end = uv - coords * lerp(ChromaAmountCenter, ChromaAmountAround, dist);
float2 delta = (end - uv) / 3.0;
VolumeComponentのカスタマイズ
シェーダーパラメータを定義したら、これらのパラメータに値を流してあげる必要があります。
VolumeComponentをカスタマイズし、パラメータの値を追加します。

ChromaticAberrationコンポーネントを書き換えます。
https://github.com/Unity-Technologies/Graphics/blob/master/Packages/com.unity.render-pipelines.universal/Runtime/Overrides/ChromaticAberration.cs
■ 修正前
/// <summary>
/// A volume component that holds settings for the Chromatic Aberration effect.
/// </summary>
[Serializable, VolumeComponentMenu("Post-processing/Chromatic Aberration")]
[SupportedOnRenderPipeline(typeof(UniversalRenderPipelineAsset))]
public sealed class ChromaticAberration : VolumeComponent, IPostProcessComponent
{
    /// <summary>
    /// Controls the strength of the chromatic aberration effect.
    /// </summary>
    [Tooltip("Use the slider to set the strength of the Chromatic Aberration effect.")]
    public ClampedFloatParameter intensity = new ClampedFloatParameter(0f, 0f, 1f);

    /// <inheritdoc/>
    public bool IsActive() => intensity.value > 0f;

    /// <inheritdoc/>
    [Obsolete("Unused #from(2023.1)", false)]
    public bool IsTileCompatible() => false;
}
■ 修正後
以下の4つのパラメータを追加しました。
ClampedFloatParameterintensityCenter
ClampedFloatParameterintensityAround
ClampedFloatParameterpositionX
ClampedFloatParameterpositionY
[Serializable, VolumeComponentMenuForRenderPipeline("Post-processing/Chromatic Aberration", typeof(UniversalRenderPipeline))]
public sealed classChromaticAberration: VolumeComponent, IPostProcessComponent
{
    //
    public BoolParameter enabled = new BoolParameter(false);

    public ClampedFloatParameter intensityCenter = new ClampedFloatParameter(0f, 0f, 1f);
    public ClampedFloatParameter intensityAround = new ClampedFloatParameter(0f, 0f, 1f);
    public ClampedFloatParameter positionX = new ClampedFloatParameter(0f, -1f, 1f);
    public ClampedFloatParameter positionY = new ClampedFloatParameter(0f, -1f, 1f);

    public bool IsActive() => enabled.value;

    public bool IsTileCompatible() => false;
}
色収差のパラメータ4つを、UnityのInspector上から制御できるようになりました。
中心付近での色のズレ (Intensity Center)
周辺での色のズレ (Intensity Around)
色収差の中心座標 (Position X, Position Y)

シェーダーにパラメータを渡す
「PostProcessPass」クラスの「SetupChromaticAberration」 というメソッドにて、UberPostシェーダーへのパラメータ設定が行われています。
こちらを書き換え、4つのパラメータを渡すようにします。
Packages/com.unity.render-pipelines.universal@12.1.8/Runtime/Passes/PostProcessPass.cs
void SetupChromaticAberration(Material material)
{
    material.SetVector(ShaderConstants._Chroma_Params,
        new Vector4(
            m_ChromaticAberration.intensityCenter.value * 0.05f,
            m_ChromaticAberration.intensityAround.value * 0.05f,
            m_ChromaticAberration.positionX.value,
            m_ChromaticAberration.positionY.value
        ));

    if (m_ChromaticAberration.IsActive())
        material.EnableKeyword(ShaderKeywordStrings.ChromaticAberration);
}
色収差の確認
作成した色収差のパラメータを使ってみます。
画面中央の色ずれを増やす
中心付近の色ずれを増やしてみました。

画面中心でも色ずれが起きます。

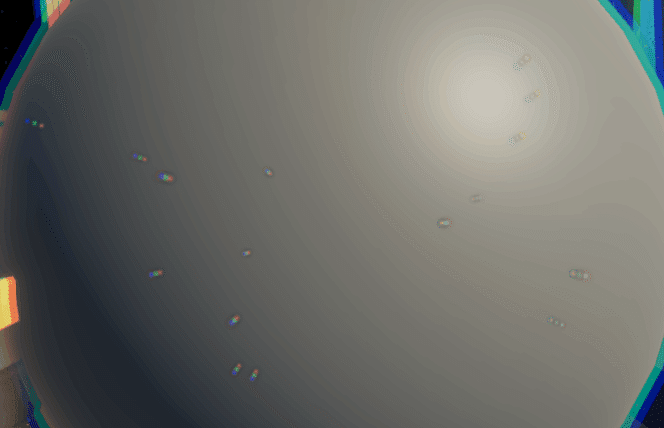
画面右上を軸とした色収差


おわりに
いかがでしたでしょうか?
今回は、URPを改造するというアプローチで、多機能な色収差を実装してみました。
ゼロからポストプロセスを実装するのは大変ですが、
すでに動いている描画コードを改造するのは、グラフィックスプログラミングの入門として良いのではないでしょうか。
明日は、はくてんさんの記事です。
Live2Dについての記事ということで、お楽しみに!